Onboarding clients can be one of the most tedious tasks when running an online business. There are a lot of steps needed to ensure you & the client feel supported. However, you can save countless hours by automating your client onboarding experience. When done right, the automation can also improve the customer experience & a better work-life balance.
Imagine a system where contracts are automatically sent, invoices are generated without manual effort, and clients receive timely follow-ups. This kind of efficiency is possible for you & I will show you how you can automate your onboarding process in 5 easy steps!
These steps will not only save you time but also ensure that every new client gets the best start with your business. Follow these actionable tips to create a seamless, error-free onboarding process that benefits both you and your clients. Let’s dive in.
P.S. Don’t have the time to automate your client onboarding process? We’re here to help! Book a consultation today, and let’s create & implement an automated onboarding process that works for you and your clients!

Would you like a SparkNotes version of this blog post? Click here to read a quick summary!
I. Map Out Your Client Journey
Mapping out your client journey is the first step to automating your onboarding process. I have written a whole blog on client journey mapping. For this blog, I am going to only focus on the Purchase/Post-Purchase phases.
The first step is to identify the key touchpoints where clients interact with your business. These can include initial inquiries, consultations, contract signing, project kick-offs, and follow-up meetings. These points are specific to when someone inquires about a purchase, goes through the buying process, and enters the onboarding phase.
Once you have your list, the next step is to understand what information is needed at each touchpoint. This ensures your client has all the information needed to smoothly go from one point to the next. This is what each stage could look like:
- Initial Inquiry: When someone reaches out, they want to know how to get started with you. Do they need to book a call, fill out an application, or take some other step? Make it clear and easy for them to move forward.
- Consultation: During the consultation, people want to know exactly how you can help them. This is your chance to show them how you’ll tackle their specific challenges and help them reach their goals.
- Contract Signing: At this point, they’re ready to sign, but they’ll want to know all the details—what’s included in your service, the terms, and what they can expect moving forward.
- Project Kick-Off: After they’ve signed and paid, what do they need to do next? Should they schedule an onboarding call, follow a checklist, or provide specific info? Make sure they’re prepped and ready to start smoothly.
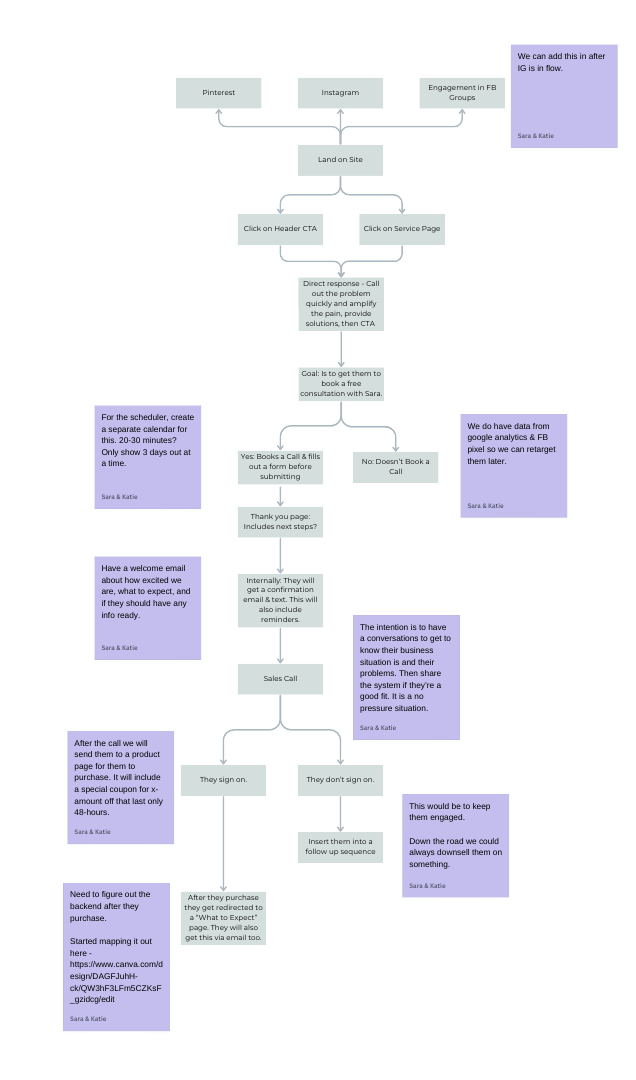
You can use the Canva Whiteboard tool to help create a visual map of this journey. This can make it easier to map out what aspect of your journey needs automating. You can see an example of ours below. A clear map ensures you don’t miss any critical steps, ultimately leading to a better client experience.
II. Pick a CRM That Suits Your Business Goals
Choosing the right CRM (Customer Relationship Management) system is so important for successful automation. You can try DIY with tools like zapier, however that would be a complete waste of your time & energy.
Start by looking for key features that align with your business goals. Essential features might include contact management, task automation, email integration, and reporting tools. These features will help you manage client information and streamline your onboarding process.
When it comes to picking a CRM, if you’re looking for customization and powerful features we would recommend Hubspot or Salesforce.
If you’re looking for something simple & easy to set up, Acuity and ActiveCampaign are great options. Something to note here is if you’re a RD, Nutritionist, Health Coach, etc some CRMs are HIPAA compliant or can have an add-on to make your CRM HIPAA compliant. Some options are PracticeBetter or Healthie.
The key thing when picking a CRM is understanding what your unique business needs & what you’re willing to invest.
When I have added other softwares to our business, I ask myself,
- “What is the purpose of this tool?”
- “What problem is it solving for Katie & I?”
- “What are features we must have vs can we live without?”
This makes it 10x easier to find the perfect solution for our unique needs. Pro tip here is to use a free trial to get the BTS look on the CRM. This will help you see if it is easy for you to use AND if it will align with your current systems & processes.
You might like this too: How to Improve Work Life Balance Without Sacrificing Online Business Growth
III. Add Your Contracts and Invoice Templates to the CRM
Once you’ve chosen your CRM, the next step is to add your essential documents, like contracts and invoice templates. Each CRM will have directions and videos on how to properly add your documents & templates. This can be a tedious task that you can outsource (We’d love to help) if you don’t have the time to dedicate to this project.
The key templates you want to create are:
- Contracts
- Invoices
- Intake/Questionnaires
- Proposal if applicable
- Applications if applicable
If you choose a platform like PracticeBetter they will come with pre-made questionnaires, intakes, and sometimes even contracts. When it comes to contracts it is best to have your lawyer review it to ensure you’re protected.
If they don’t come with pre-made templates, most CRMs allow you to upload and store documents, so you can easily send them as needed. This saves time and ensures consistency across all client communications.
Plus, once you have these templates in place when a new client signs up, you can automatically send out contracts and invoices without lifting a finger.
By having your templates in place, it will help maintain consistency and create a smooth onboarding experience for your clients/customers & you.
P.S. During this phase of setting up your CRM, you can also create calendars for easy scheduling too!
IV. Set Up Automation Based on Client Actions
Once you have your templates, calendars, and basic info set up in your CRM, the next step is to create workflow automations.
Start by setting up automation triggers based on specific client actions. For example, when a client signs a contract, you can set a trigger to automatically send the next onboarding email.
Some other automations can be:
- Sending a welcome email once an invoice has been paid.
- Having a contract sent once a proposal has been approved of.
- Sending reminders for upcoming calls, check in forms, and more.
- Having questionnaires sent once a client has booked their first call.
If you refer back to step 1, by having those clear touchpoints mapped out, you can easily see what can be automated or outsourced if need be.
By having automation in place, it keeps both you and your client on the same page without a constant manual effort.
I would recommend regularly reviewing and updating your workflows to incorporate any new client feedback or business changes. By doing so, you can keep the process efficient and user-friendly, which helps keep clients happy and fosters long-term relationships.
Final Thoughts
Automating your client onboarding process is the best way to free up your time. Having a CRM in place allows you to step away knowing any need or current clients will be taken care of. This is your first step in creating a business that works for you rather than you working for it.
If you’re ready to automate more than just your onboarding process, book a free consultation to learn how we can organize your business operations so you can grow our business while still having a personal life too.
P.S. If this blog was too long to read, here is the gist:
- Map out your client journey from applying/booking a call to be onboarded.
- Pick a CRM that aligns with your business goals, current systems, and level of tech savviness.
- Begin adding your contracts, invoices, questionnaires, and calendars to the platform.
- Start building automations to streamline your onboarding from start to finish.
- Review and update your process based on client feedback & changes in your business.
- Don’t have the time for this? Book a free consultation with us to find out how we can help you find the perfect systems for a more organized, stress-free business.




0 Comments